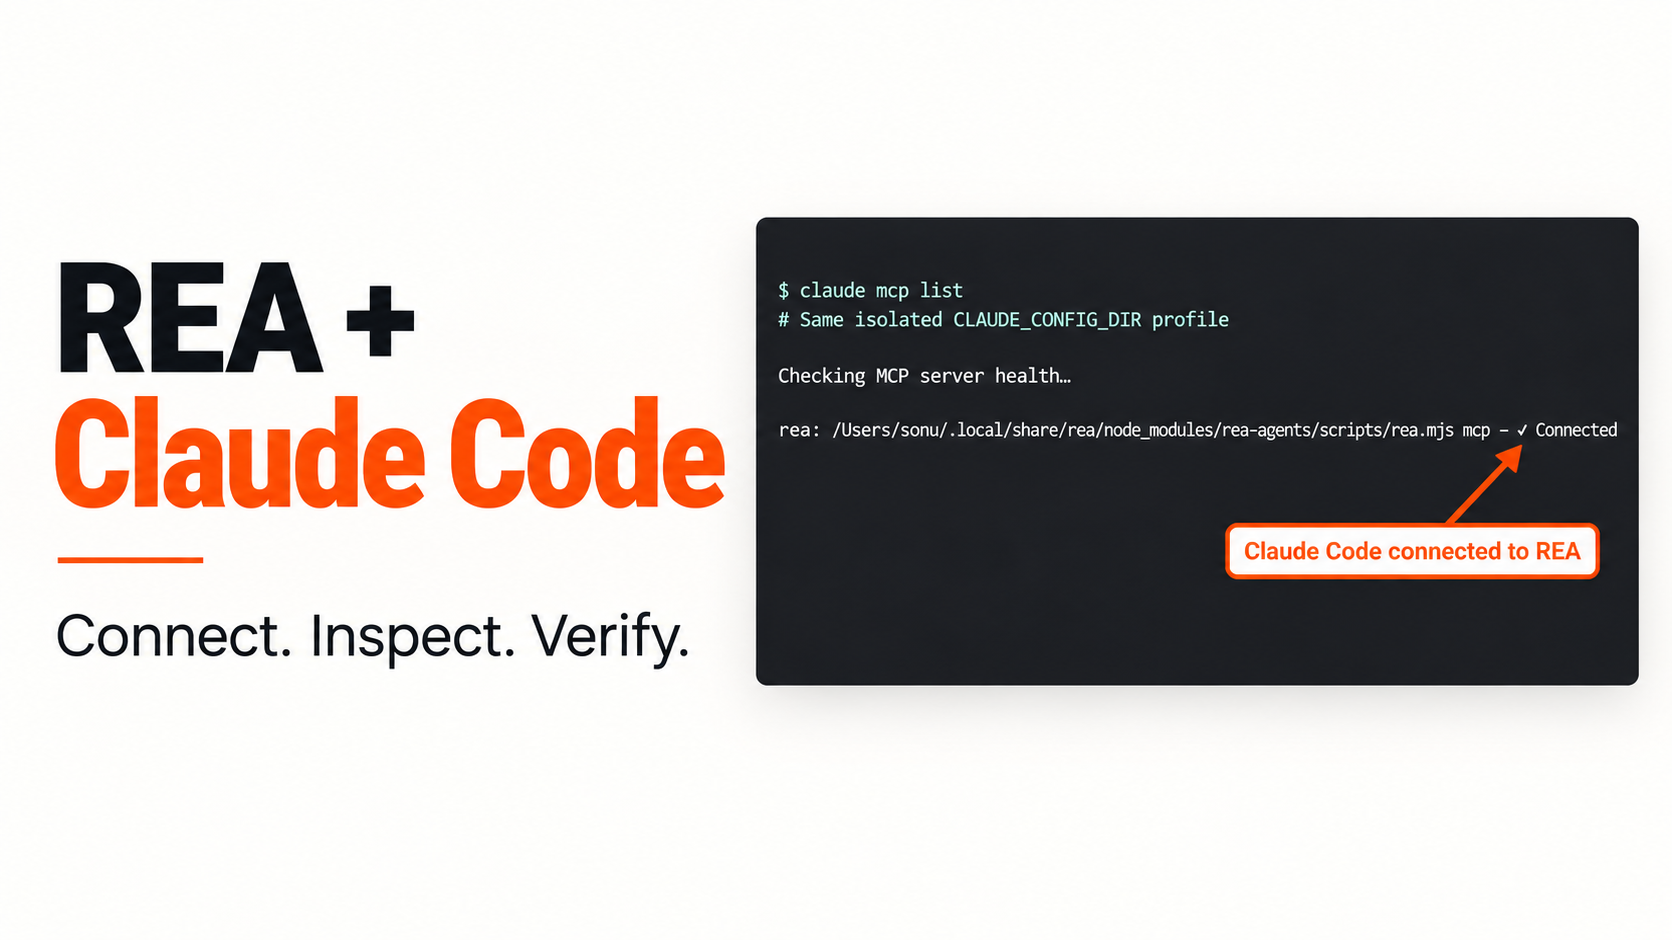
Connect REA to Claude Code, check the connection, and verify a small export feature without installing a native decompiler. This walkthrough gives you a checkpoint after each step so you can identify a setup problem before spending time on a larger app.
You will get:
- A compatible-runtime check and a preview of the configuration changes.
- A tested Claude server-health check.
- A sample investigation and runnable export-handler tests.
The official entry point is npx rea-agents@latest setup. Instructions and npm metadata were checked on 31 October 2026, when npm listed REA 6.8.0. Official REA project.
Jump to a step
- Check your runtime and select REA
- Preview the Claude Code setup
- Apply the reviewed configuration
- Check the Claude Code connection
- Investigate the sample’s export path
- Test the finding before building
Already stuck? Go to If setup fails.
What we tested—and what the screenshots show
Our checks used macOS, Node.js 24.22.1, npm 11.5.2, Claude Code 2.1.218 and an existing REA 6.8.0 installation. We created a new, separate Claude configuration profile, applied the setup there, and confirmed that claude mcp list reported REA as connected. We also ran REA’s JavaScript analysis and three focused handler tests.
This is a clean-profile configuration test, not a completed fresh-machine installation: the fresh npm acquisition attempt did not finish during this session. We did not test Windows or Linux, a live Claude-generated answer, or the fixture’s native Electron save dialog.
The screenshots show saved command output; selected JSON fields are labeled. Arrows and cover images are editorial annotations, not additional test results. Expand a screenshot to read it, or use the download for the underlying evidence.
Before you start: choose a small, checkable target
Use a working Claude Code installation and a folder containing a small app you own or can inspect. For this walkthrough, use the included Pocket Notes 1.0.0 learning fixture. It contains five files, including a renderer, a preload bridge and a main-process export handler. Its source is intentionally available, which lets us check REA’s findings directly.
Extract the sample into a stable local folder that is not being edited or synced while analysis runs. Record its absolute path; you will pass that path to REA later. Download the screenshot and test kit. The kit contains the fixture, the handler test and the captured analysis.
If you are starting with a larger app, first choose a suitable REA target. One feature with an observable result is a better first investigation than a request to reproduce an entire product.
1. Check your runtime and select the official REA package
Start in your terminal and check the tools you already have:
node --version
npm --version
claude --version
npm view rea-agents version engines --json
At verification time, REA 6.8.0 declared this Node range:
^22.23.4 || ^24.22.1 || >=26.12.1Check the patch version, not just the major number. Our shell initially reported Node 22.15.0, which did not meet that requirement. We selected the compatible Node 24.22.1 runtime already installed on the machine. Do not copy the runtime path from our screenshot; select a supported runtime on your own machine and confirm it with node --version. Official package requirements.
Once those checks pass, open a trusted working directory outside the app you intend to analyze. The current guided entry point is:
npx rea-agents@latest setupThe next step previews those changes.
If rea --version already reports the version you intend to use, you can use rea in place of the package-runner prefix, as we did in the captured test. An existing CLI does not by itself establish a Claude connection.
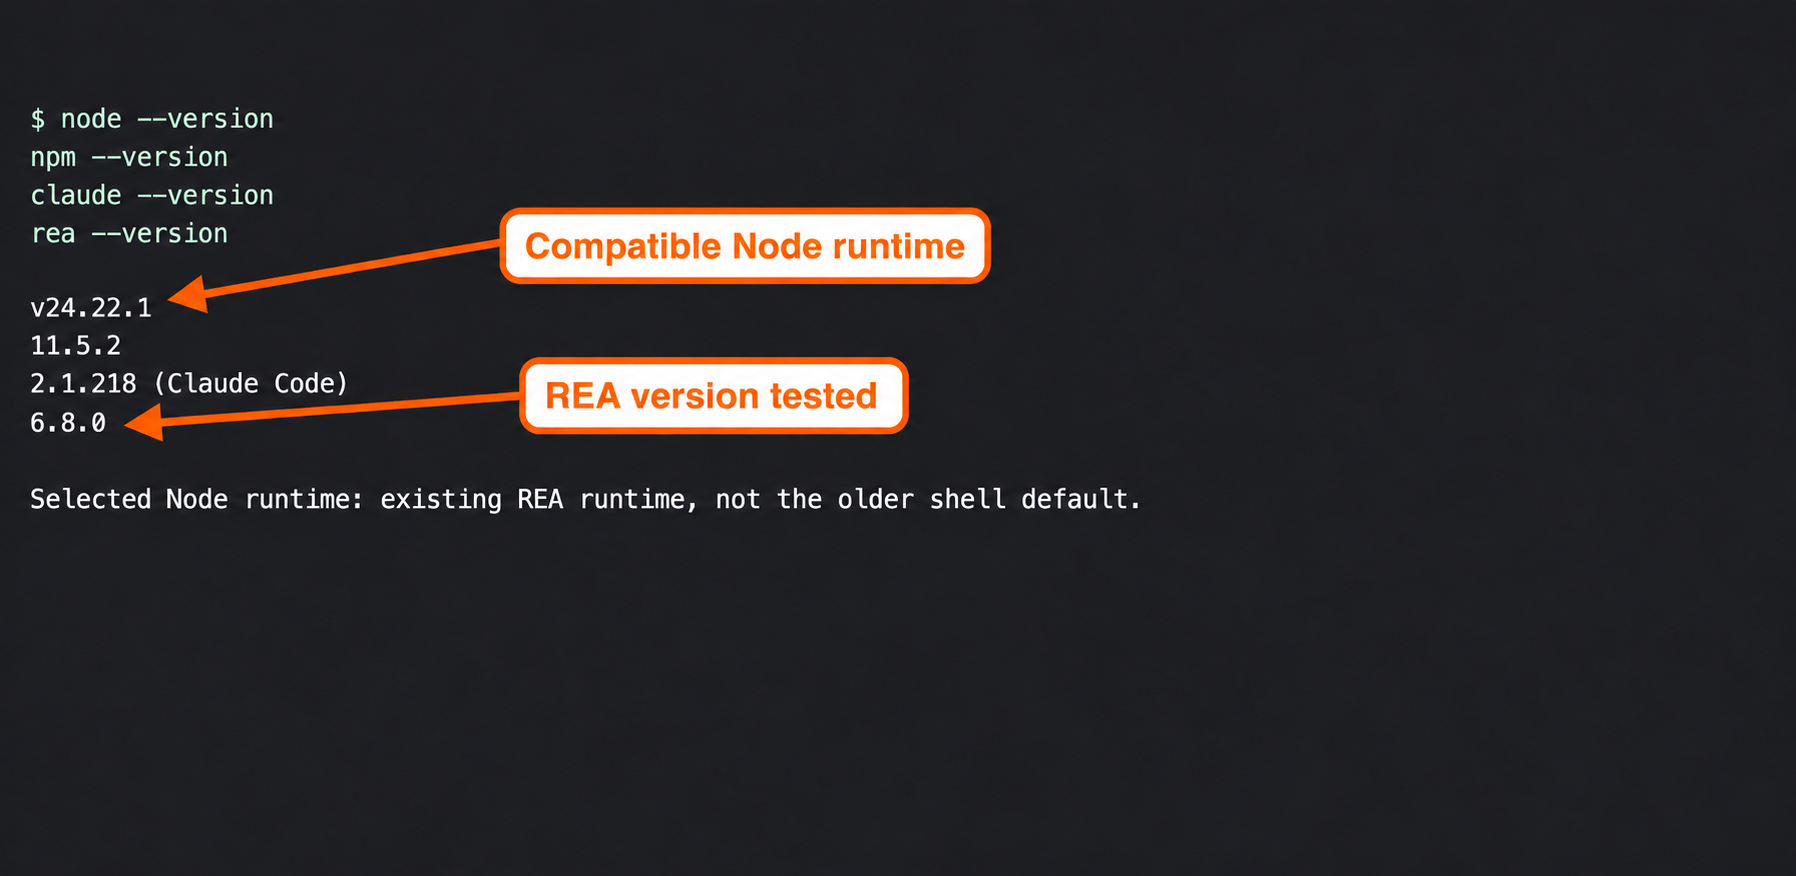
Actual local version checks using the existing compatible runtime. These are recorded outputs, not a fresh installation.
2. Preview the Claude Code setup before writing configuration
For a normal Claude Code setup, run:
npx rea-agents@latest setup --client claude_code --dry-run --jsonRead the proposed destinations and actions. You want the intended Claude profile, the REA server registration and the matching workflow instructions. A preview is not an installed connection: in our output, status was planned and appliedActions was empty.
We used a separate profile for the walkthrough so the test would not change the normal Claude configuration. If you also want a separate macOS profile, set it before the preview and keep it selected through setup, checks and launch:
export CLAUDE_CONFIG_DIR="$HOME/.claude-rea-guide"
npx rea-agents@latest setup --client claude_code --skill-client claude_code --dry-run --json
Choose an unused profile directory for your test. This is an optional profile choice, not an extra requirement for REA. It separates configuration; it is not an operating-system sandbox. A new profile may also need Claude authentication.
Our preview contained exactly two planned actions: create the Claude Code registration and install its REA skill. If your plan points somewhere unexpected, stop and correct the profile selection before continuing. Official installation and profile instructions.
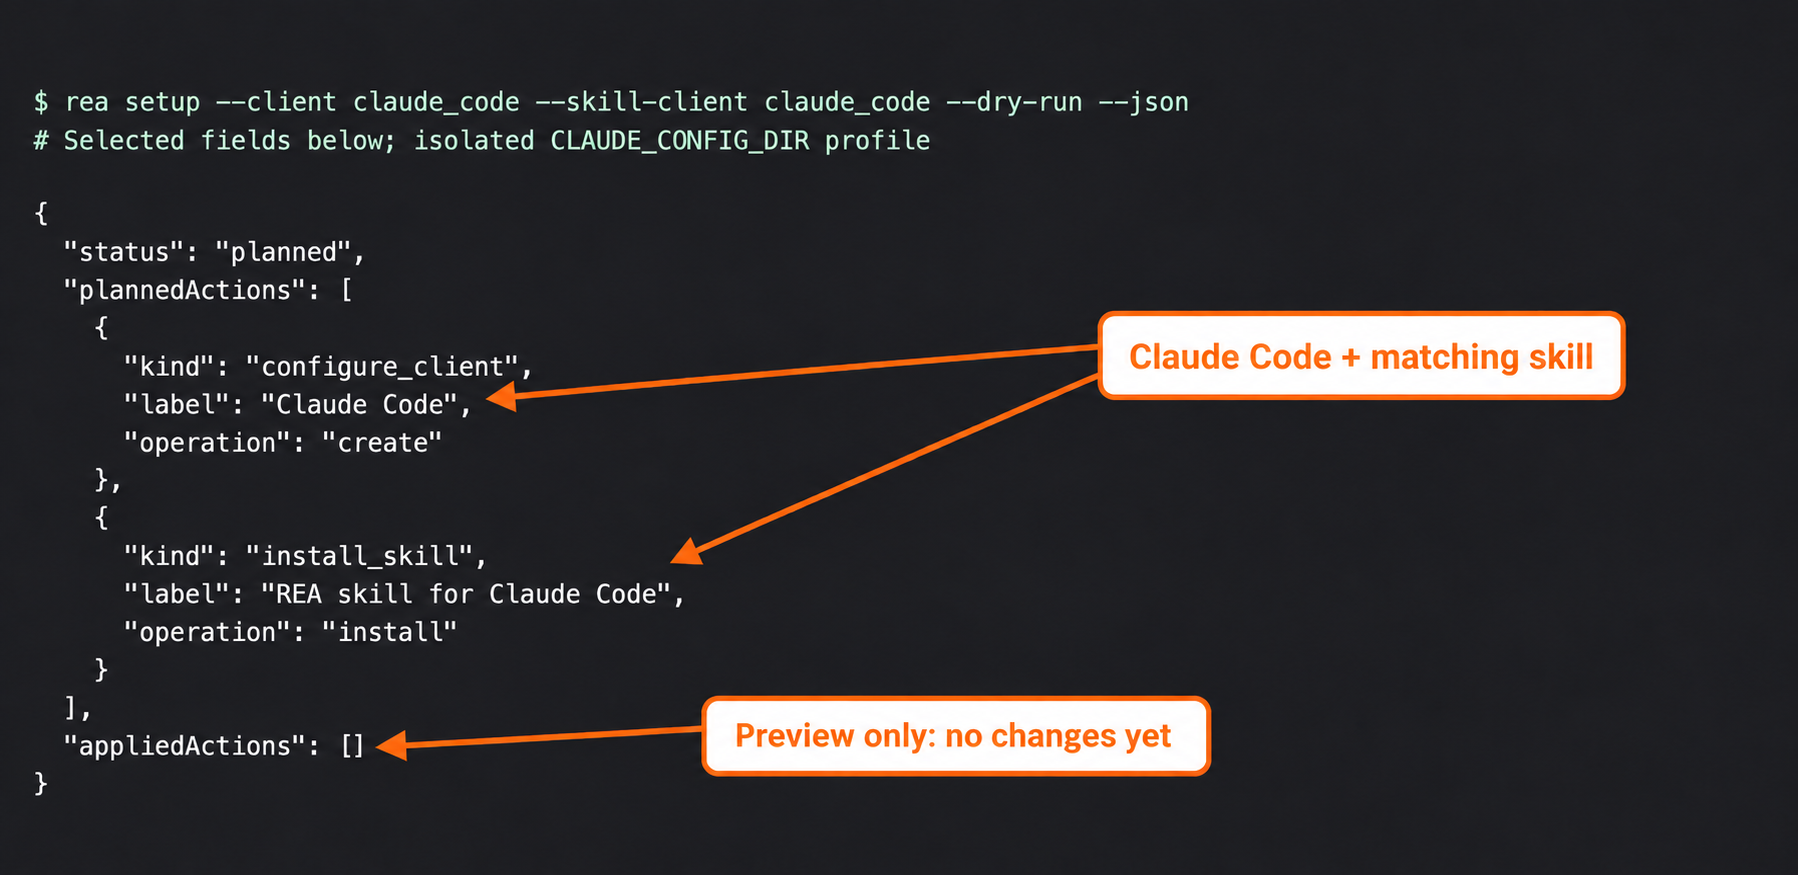
Selected dry-run fields: two planned actions and no applied actions in a separate Claude profile.
3. Apply the reviewed plan and check the completion result
With the intended profile still selected, rerun the same setup command without --dry-run:
npx rea-agents@latest setup --client claude_codeIf you used the explicit skill selection in the separate-profile preview, preserve it:
npx rea-agents@latest setup --client claude_code --skill-client claude_codeReview the interactive plan and approve the changes you intend. Package acquisition and configuration approval are separate stages. For this JavaScript example, you do not need to add a native analysis engine.
Our recorded application used the existing rea CLI with --yes --json after reviewing its saved plan. That is why the screenshot shows a non-interactive command. Keep the interactive approval flow for your first setup.
The result reported status: ready, with configured_claude_code and installed_skill in the applied actions. The selected-scope health check passed. The broader environment check remained false because optional analysis engines were absent; that did not prevent the JavaScript analysis later in this guide.
Treat this as confirmation that the configuration was written. The next step checks whether Claude Code can actually connect.
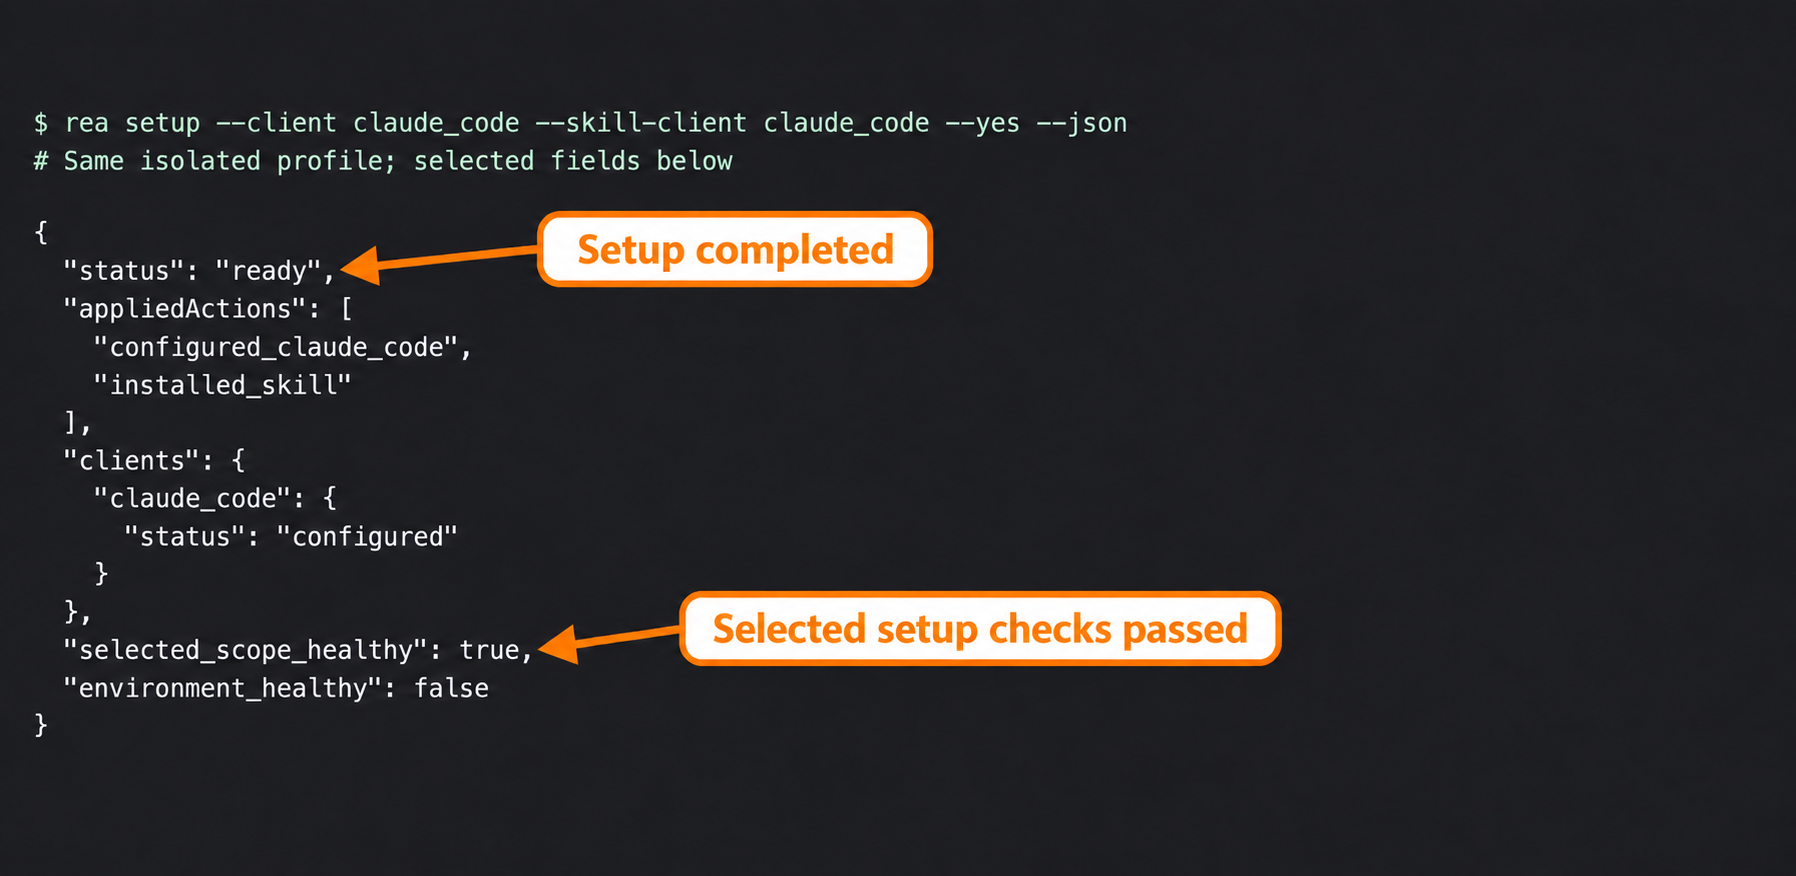
Selected applied-setup fields: Claude registration and skill installed; selected scope healthy, optional engines absent.
4. Restart Claude Code and confirm the REA connection
Close the affected Claude session and start a new one after setup. If you selected a separate profile, keep the same CLAUDE_CONFIG_DIR in the terminal used for every check and launch.
First ask the Claude Code CLI to check its configured servers:
claude mcp listOur result showed REA with a connected status. This is stronger evidence than simply finding a registration in a JSON file: the client performed a server-health check.
Then start Claude Code:
claudeInside the session, enter /mcp and inspect the REA server’s status and available tools. Follow the client’s normal approval prompts for the target you intend to inspect. Claude Code MCP documentation.
A saved registration, a successful connection and a completed analysis are separate checkpoints. If the server is missing or disconnected, use the REA troubleshooting guide before moving on. If it connects, the next step gives it a small, concrete task.
We verified the CLI connection check shown here. We did not capture a live Claude conversation making the subsequent analysis call, so the next screenshot is explicitly the independent REA CLI check.
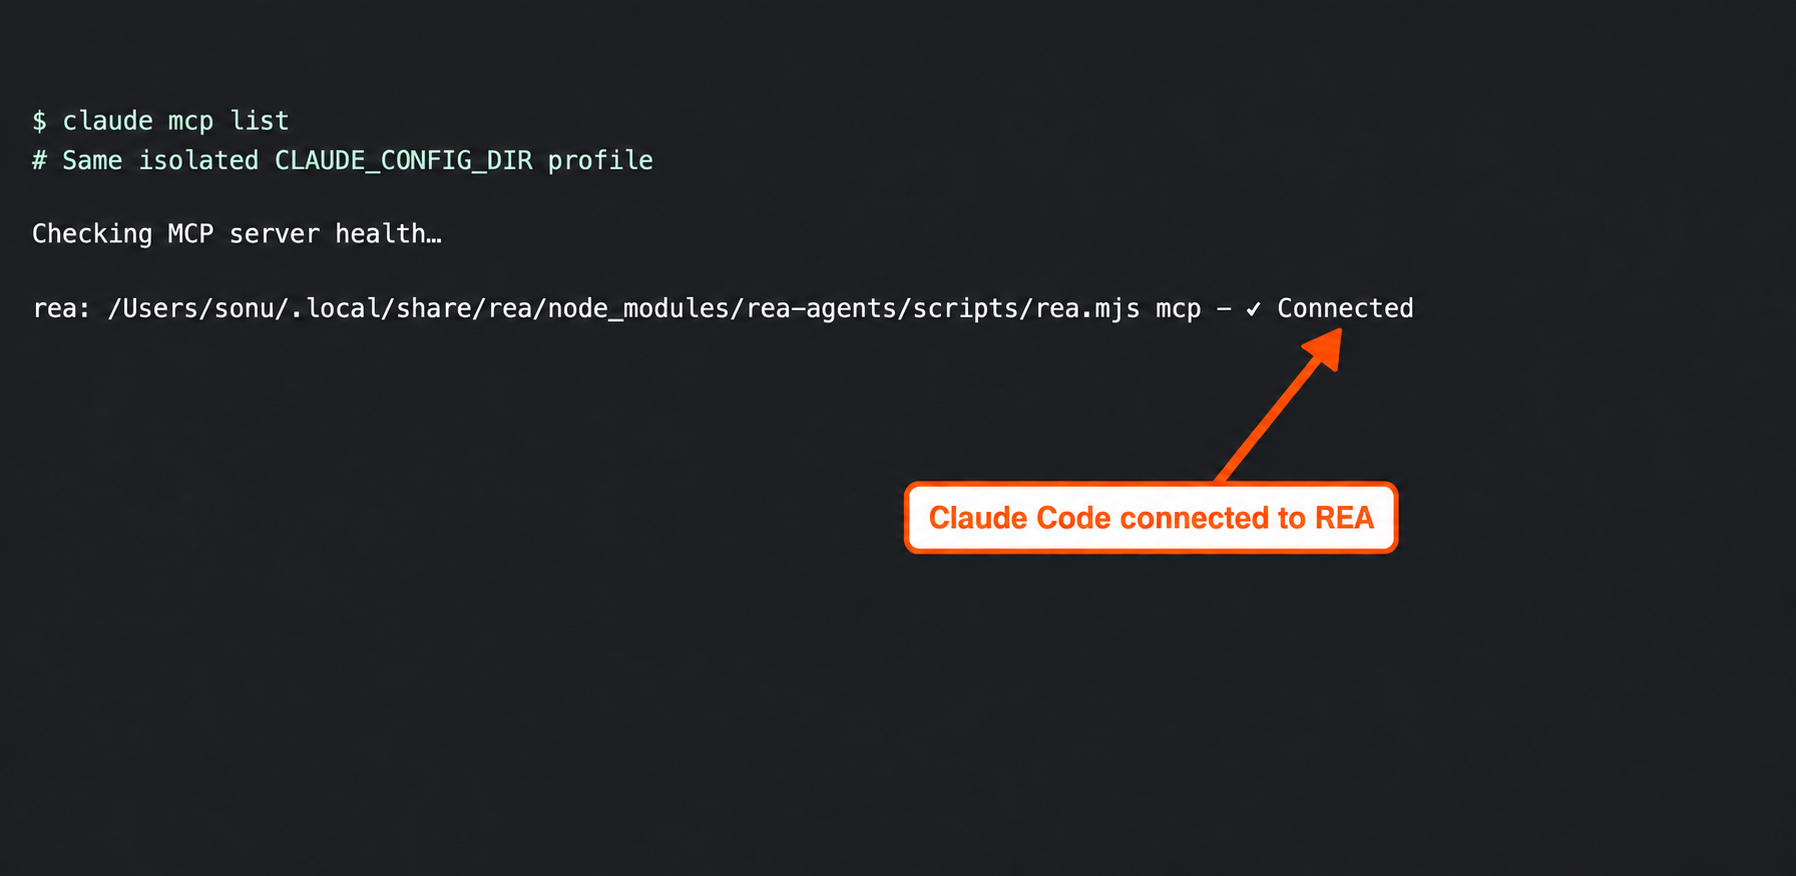
Actual Claude Code server-health output reports REA connected. No live Claude analysis conversation was captured.
5. Investigate one feature: how Pocket Notes exports notes
Give Claude the absolute path to your extracted fixture and ask one bounded question:
Use REA to inspect the Pocket Notes fixture at [ABSOLUTE PATH].
Analyze it as static JavaScript. Trace how the export button reaches
the main-process handler. Identify the exposed API, IPC channel and
referenced files. Separate observed syntax from inferred behavior.
Do not launch the app, change files or build a replacement.
Replace the bracketed path before sending the prompt. Keeping the task narrow makes the result easier to inspect; the REA prompt guide explains how to adapt this pattern.
You can independently check the analysis outside Claude:
npx -y rea-agents@6.8.0 analyze-javascript-application /absolute/path/to/pocket-notes --jsonThis command pins the version used for this article. Use your own absolute fixture path. Our recorded run used the already-installed rea command and a stable copy at /tmp/rea-setup-guide-fixture.
The returned Evidence record reported three parsed JavaScript files, zero parse failures, one exposed API member and one paired renderer transmission. To turn those counts into a useful finding, follow the source references:
renderer.jshandles the export button and callswindow.notesAPI.exportNotes(notes).preload.cjsexposesnotesAPI.exportNotesand invokes thenotes:exportchannel.main.cjsregisters the matching handler, asks for a save path and prepares CSV output.
This is a traceable explanation of the fixture’s code. It is not yet proof that a native save dialog opens or a file reaches the disk. REA’s result explicitly says this was static analysis. Keep that boundary intact when you write your own finding.
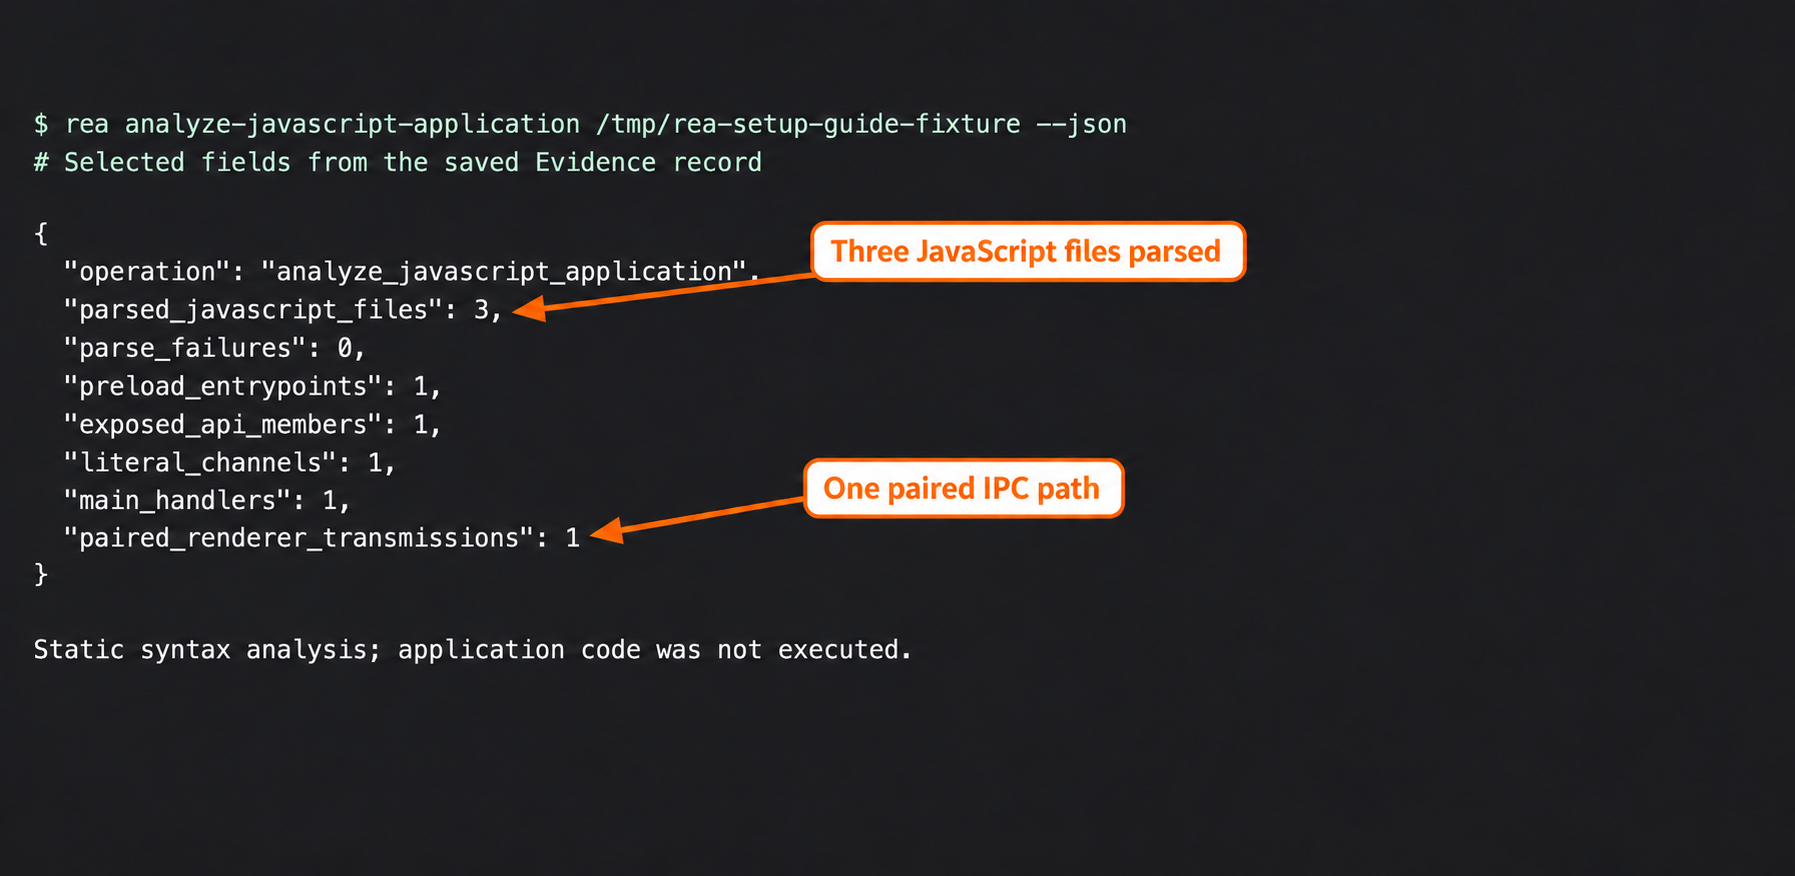
Selected fields from actual static REA analysis: three JavaScript files parsed and no parse failures. The app was not executed.
6. Test the export behavior before building on the finding
Now turn the explanation into checks that could fail. For the export handler, three useful questions are: does canceling avoid a write, does a missing path avoid a write, and does a successful selection produce the intended CSV?
Run the included test from the extracted test-kit directory:
node verify-export.cjs /absolute/path/to/pocket-notesThe test loads the fixture’s actual main.cjs handler, substitutes a controlled dialog response and records calls to the file-writing function. It checks three cases:
- Canceling returns
saved: falseand does not request a write. - A missing file path also returns
saved: falsewithout a write. - A selected path produces quoted CSV, including escaped quotation marks, and returns
saved: true.
All three checks passed in our run. Because the dialog and file-writing dependency were mocked, these results verify handler behavior under controlled inputs; they do not verify the Electron interface or operating-system integration.
For an end-to-end check, run a suitable Electron build of the fixture, click Export, cancel once, and then save once. Inspect the saved CSV and the displayed status. Record that result separately rather than treating the handler test as a substitute.
Your evidence ledger can now say: the export path is supported by the source and REA analysis; the handler passed three controlled tests; the native dialog and real disk write remain untested here. Use the finding-verification checklist to keep that distinction clear on your next target.
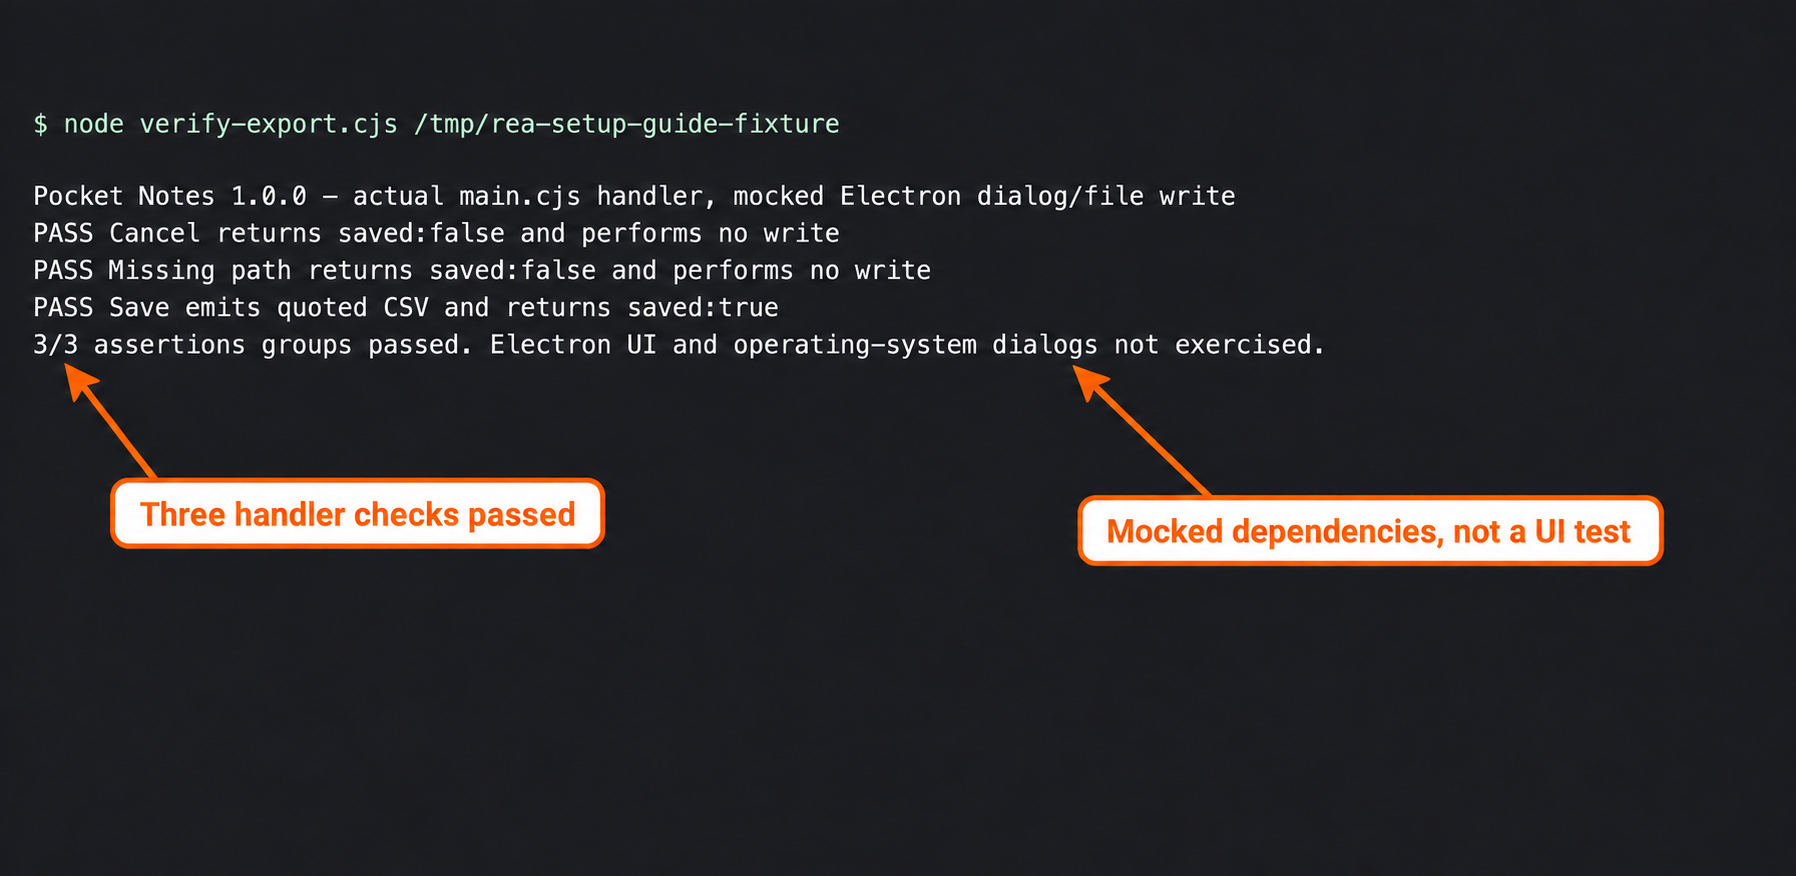
Actual handler-test output: three checks passed with mocked dialog and file-write dependencies. Native UI was not tested.
If setup fails, identify which checkpoint failed
Start with the exact error rather than reinstalling everything.
| Symptom | First check | Next action |
|---|---|---|
| Unsupported Node version | Compare node --version with the package’s current engine range |
Select a compatible runtime, then retry the same command |
| No REA server in Claude | Check the profile used for setup and launch | Use the same profile and inspect the setup result |
| REA is present but disconnected | Read the launch error and check the configured installation path | Repair the named launch problem, then restart |
| CLI analysis works but Claude does not | Separate the analysis result from the MCP connection | Diagnose the client configuration |
| Artifact-integrity error during analysis | Check whether the target files changed or were still syncing | Analyze a stable copy and retain the original error |
We encountered the last case when analyzing the working-tree fixture: REA reported that index.html changed during the read. Analysis succeeded after copying the fixture into a stable temporary directory. That is evidence for this run’s recovery, not a universal fix for every integrity error.
For a scoped diagnostic, run:
npx -y rea-agents@latest doctor --client claude_code --jsonIf you selected a separate profile, preserve that environment selection for this command too. Save the error and the diagnostic result, then follow the troubleshooting guide for the affected layer.
Frequently asked questions
Do I need Ghidra or Hopper for this tutorial?
No. This example uses static JavaScript analysis. Our recorded analysis succeeded without an available native analysis engine. A native-binary investigation is a different workflow and may need an appropriate provider.
Why does setup say ready while the broader environment check is false?
In our run, the selected Claude setup checks passed while optional engines were absent. Read the failed check and its scope before deciding whether it affects your task. A broad environment summary is not the same as the result of your actual analysis.
Can I paste the same configuration onto another computer?
Do not copy machine-specific executable paths. Run setup in the intended environment and review its own plan. This article’s commands and captures were checked on macOS; we have not presented Windows or Linux steps as locally tested.
Does a connected server prove Claude has analyzed my app?
No. It establishes the connection checkpoint. You still need a successful tool call against your chosen target and a finding you can verify.
Continue with one feature you can check
You now have a practical completion checklist: use a compatible runtime, apply the intended setup plan, confirm the Claude connection, obtain an analysis and test the claim that matters.
For your next investigation, choose a suitable target, write a scoped prompt and verify the result. Keep the target version, command, evidence and test outcome together. That record is what lets you move from an interesting explanation to a decision you can defend.
Related video workflow
Code With Aarohi’s practical REA walkthrough, from 12:50, moves from setup and inspection to a bounded drawing example. This article follows that inspect-before-build sequence with our own Pocket Notes fixture. The video’s Windows steps are creator-reported; our local checks were on macOS.